So far we’ve covered two basic tenets to network security: documentation and network segmentation and isolation. Network access control layers nicely on top of those. You are taking the defined data flows (what devices are allowed to communicate over specific ports and protocols) that were identified in your design/documentation process and implementing them via access control lists (ACL’s) at various locations within your environment. If you do this properly, you are leveraging the isolation and segmentation previously implemented with your VLANs and providing a seamless structure to place these network access control lists.
We are going to look at different types of network access control lists, where they are best implemented, some strategies for increasing their efficiency, and how they can be useful for more than just permitting or denying communication traffic.
Network Access Control Lists
To recap for those who might need a refresher, when we are discussing a network ACL, we are talking about an access control lists that is implemented on either a network device or host device that allows or blocks traffic based off of specific communication rules. These rules are usually associated with a source IP, destination IP, protocol (IP, TCP, UDP, ect.) and a specific service or service port number. For instance, if we look at the table below, we have the basic ingredients that would be in an ACL. This particular one would allow web traffic over HTTPS/TLS from the source IP to the destination IP.
| Action | Source IP | Destination IP | Protocol | Service |
| Permit | 10.10.10.1 | 10.10.11.1 | TCP | 443 (TLS/HTTPS traffic) |
This type of information would then be taken and written in the format of the software of the device that would be providing the ACL. This differs a lot depending on vendor and we will dive a little bit more into some vendor-specific examples in the next section. A key component to remember about ACL’s is that they are read from the top to the bottom of the list. This becomes very important when creating larger ACL’s. Often times engineers will forget and put a permit statement lower in the ACL than a deny statement, which then inadvertently blocks their intended traffic. Below is an example of how that might look.
| Action | Source IP | Destination IP | Protocol | Service |
| Permit | 10.10.10.0/24 | 10.10.11.1 | TCP | 443 (SSL/Web traffic) |
| Permit | 10.10.12.0/24 | 10.10.11.1 | TCP | 443 (SSL/Web traffic) |
| Deny | Any | 10.10.11.1 | TCP | 443 (SSL/Web traffic) |
| Permit | 10.10.13.0/24 | 10.10.11.1 | TCP | 443 (SSL/Web traffic) |
In this case, the 10.10.10.0/24 and 10.10.12.0/24 subnets are able to communicate with the web server at 10.10.11.1. However, even though a permit statement was added to allow the 10.10.13.0/24 subnet to do the same, because there is a deny statement above it stopping any address from communicating to the web server, any device in the 10.10.13.0/24 subnet cannot reach the web server over TCP 443. A situation like this can become very tricky if you have an ACL with tens or hundreds of rules in it. To fix the above problem, we would just take the permit rule on the bottom and insert it above the deny rule within the configuration.
| Action | Source IP | Destination IP | Protocol | Service |
| Permit | 10.10.10.0/24 | 10.10.11.1 | TCP | 443 (SSL/Web traffic) |
| Permit | 10.10.12.0/24 | 10.10.11.1 | TCP | 443 (SSL/Web traffic) |
| Permit | 10.10.13.0/24 | 10.10.11.1 | TCP | 443 (SSL/Web traffic) |
| Deny | Any | 10.10.11.1 | TCP | 443 (SSL/Web traffic) |
One final key thing to remember about ACL’s is that all ACL’s end with an invisible deny statement, known as the “deny by default” statement. This is somewhat tricky for newer admins and engineers to remember. They will look at the ACL and not see a specific rule that is blocking the traffic. It’s really important to understand that ACL’s are a permit by exception, so if you don’t explicitly tell it to allow certain traffic, the ACL will not allow it. A good practice and what most well seasoned engineers will do is add in an additional deny all traffic statement at the end of every ACL to reinforce this idea. If they are really smart, they will also add on a statement to log all of the traffic that hits that rule (as seen below)! We’ll go into why it’s a good idea to add a log statement to all denied traffic in the last section.
| Action | Source IP | Destination IP | Protocol | Service |
| Permit | 10.10.10.0/24 | 10.10.11.1 | TCP | 443 (SSL/Web traffic) |
| Permit | 10.10.12.0/24 | 10.10.11.1 | TCP | 443 (SSL/Web traffic) |
| Permit | 10.10.13.0/24 | 10.10.11.1 | TCP | 443 (SSL/Web traffic) |
| Permit | 10.10.10.0/24 | 10.10.11.2 | TCP | 443 (SSL/Web traffic) |
| Deny(L) | Any | Any | Any | Any |
Types of ACL’s
From my viewpoint, there are a few main types of network ACL’s that most engineering folks will run into: network-device based ACL’s (Juniper, Cisco, Palo Alto, etc.), Linux-OS based IP tables, and then vendor specific, host-based firewalls which are normally integrated into some type of anti-virus, host-based protection software suite. It’s also key to understand that all ACL’s aren’t created the same (i.e. use the same format) even when dealing with the same vendor.
Cisco, for instance, has different ACL formats depending upon whether we are talking about Nexus switches, Catalyst switches, or their firewalls. Juniper, on the other hand, even has multiple formats for ACL’s on the same device (filters vs their zone-based firewall configurations). One key point to mention is the difference between zone-based firewalls/ACL’s and standard ACL’s.
For standard ACL’s, an engineer defines all the rules that they want to implement and attaches it to an interface or VLAN. Normally, in this instance, the rules are not stateful. This means that you need to specifically allow the inbound traffic, as well as allow the response traffic for the session. Zone-based firewalls ACL’s, for the most part, are stateful and thus only require you to put a rule for the initial communication and not the response traffic (generally, as long as it is part of the same session). Some folks don’t have a solid grasp of stateful policies, and you might run into a situation where you see a multitude of unnecessary bi-directional rules in an environment.
Zone-based rules also make things a bit more compartmentalized and strategic. In essence, you create different security zones (normally associated with a particular VLAN/subnet), and then craft the ACL’s to only be applicable between the source zone and the destination zone of the specific traffic. This makes for much easier reading of ACL rules. Most firewalls nowadays implement ACL’s in this manner. The good thing is that once you have an understanding of how ACL’s actually work, it’s more just a matter of learning the correct context. Once you have the basics down, the learning curve is not very steep.
Below are some examples of how we would write the same ACL across different platforms (Cisco Catalyst, Cisco Nexus, Juniper Junos zone-based firewall, and Linux IP tables).
Cisco Catalyst ACL’s
Standard ACL
Standard IP access list Sample1
10 permit 10.10.10.0 0.0.0.255
20 permit 10.10.12.0 0.0.0.255
30 permit 10.10.13.0 0.0.0.255
40 deny any log
Extended ACL
Extended IP access list Sample2
10 permit tcp 10.10.10.0 0.0.0.255 host 10.10.11.1 eq 443
20 permit tcp 10.10.12.0 0.0.0.255 host 10.10.11.1 eq 443
30 permit tcp 10.10.13.0 0.0.0.255 host 10.10.11.1 eq 443
40 permit tcp 10.10.10.0 0.0.0.255 host 10.10.11.2 eq 443
50 deny ip any any log
Cisco Nexus ACL
IP access list Sample3
10 permit tcp 10.10.10.0/24 10.10.11.1 eq 443
20 permit tcp 10.10.12.0/24 host 10.10.11.1 eq 443
30 permit tcp 10.10.13.0 0.0.0.255 host 10.10.11.1 eq 443
40 permit tcp 10.10.10.0 0.0.0.255 host 10.10.11.2 eq 443
50 deny ip any any log
Juniper SRX Zone Base Security Policy
JBC@host> show security policies
from-zone Workstations to-zone Servers
{
policy HTTPS1 {
match {
source-address [10.10.10.0/24 10.10.12.0/24 10.10.10.13/24];
destination-address 10.10.11.1/32;
application junos-https;
}
then {
permit;
}
}
policy HTTPS2 {
match {
source-address 10.10.10.0/24;
destination-address 10.10.11.2/32;
application junos-https;
}
then {
permit;
}
}
policy Default-Deny {
match {
source-address any;
destination-address any;
application any;
}
then {
deny;
log {
session-init;
}
}
}
}
Implementing the Above Configuration
set security policies from-zone Workstations to-zone Servers policy HTTPS1 match source-address 10.10.10.0/24
set security policies from-zone Workstations to-zone Servers policy HTTPS1 match source-address 10.10.12.0/24
set security policies from-zone Workstations to-zone Servers policy HTTPS1 match source-address 10.10.13.0/24
set security policies from-zone Workstations to-zone Servers policy HTTPS1 match destination-address 10.10.11.1/32
set security policies from-zone Workstations to-zone Servers policy HTTPS1 match application junos-https
set security policies from-zone Workstations to-zone Servers policy HTTPS1 then permit
set security policies from-zone Workstations to-zone Servers policy HTTPS2 match source-address 10.10.10.0/24
set security policies from-zone Workstations to-zone Servers policy HTTPS2 match destination-address 10.10.11.2/32
set security policies from-zone Workstations to-zone Servers policy HTTPS2 match application junos-https
set security policies from-zone Workstations to-zone Servers policy HTTPS2 then permit
set security policies from-zone Workstations to-zone Servers policy Default-Deny match source-address any
set security policies from-zone Workstations to-zone Servers policy Default-Deny match destination-address any
set security policies from-zone Workstations to-zone Servers policy Default-Deny match application any
set security policies from-zone Workstations to-zone Servers policy Default-Deny then deny
set security policies from-zone Workstations to-zone Servers policy Default-Deny then log session-init
Linux/Unix IP Tables ACL
iptables -A INPUT -p tcp –src 10.10.10.0/24 –dst 10.10.11.1/32 –dport 443 -j ACCEPT
iptables -A INPUT -p tcp –src 10.10.12.0/24 –dst 10.10.11.1/32 –dport 443 -j ACCEPT
iptables -A INPUT -p tcp –src 10.10.13.0/24 –dst 10.10.11.1/32 –dport 443 -j ACCEPT
iptables -A INPUT -p tcp –src 10.10.10.0/24 –dst 10.10.11.2/32 –dport 443 -j ACCEPT
iptables -A OUTPUT -m conntrack –ctstate ESTABLISHED -j ACCEPT
iptables -N LOGGING
iptables -A INPUT -j LOGGING
iptables -A LOGGING -m limit –limit 2/min -j LOG –log-prefix “IPTables Packet Dropped: ” –log-level 7
iptables -A LOGGING -j DROP
The above were examples of writing out ACL’s via the command line, but a lot of organizations utilize network and host-based firewalls that rely on a graphical user interface (GUI) to implement the rules. This can be a very useful tool in helping new engineers visualize the ACL’s they are putting in place. A great GUI that I used when I was a younger network engineer was the Juniper ScreenOS firewalls. It made it very easy to learn and implement ACL’s in a zone-based configuration. It also made it much easier to get newer junior engineers up to speed within the environment.
Strategies for Implementation
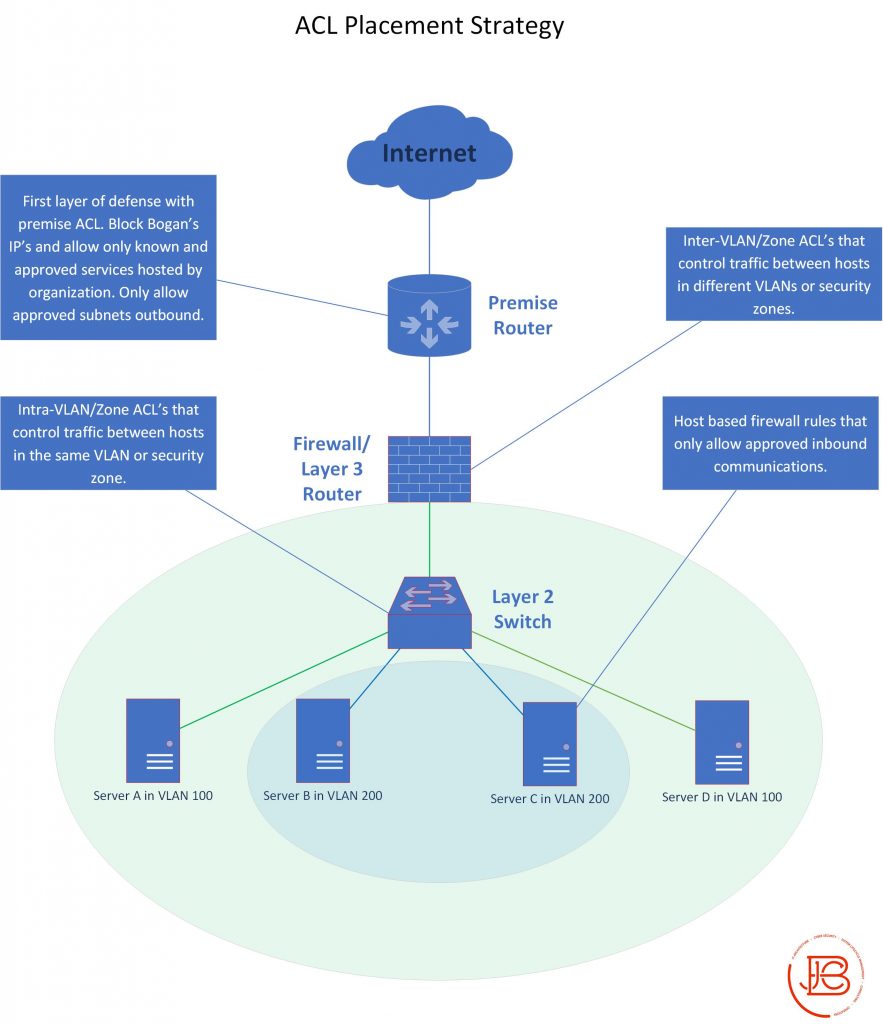
When it comes to strategies for ACL implementation, I like to deploy them in a defense-in-depth model. Ideally, there are four minimum areas that I would implement.
- Premise-Based ACL’s
- These reside on your most outward facing network devices (probably a router or switch) where your Internet circuits are plugged into. These ACL’s would knock down a large amount of unwanted SPAM packets that flood the Internet. I would implement both inbound and outbound rules. Only allow out traffic from your specific publicly routable IP space, block private IP space, implement Bogans lists, and also only allow known expected protocols that should be coming into your environment from the Internet. Conversely, that means blocking all other protocols (i.e. port scanning attempts).
- Inter-Zone ACL’s
- These would reside on devices that are doing your routing.
Ideally, if you are routing a lot of traffic through a firewall, this would be a perfect place to set up zone based rules between various security zones. The rules permit and deny communication between different subnets/VLANs/zones. I like to make a security zone for every VLAN, but even at a minimum, break up your zones to external (untrusted) DMZ, servers, and workstations. Ideally, if you follow the advice in the previous Segmentation and Isolation post, you have a security zone for each type of unique service.
- These would reside on devices that are doing your routing.
- Intra-Zone ACL’s
- These ACL’s reside within a security zone/VLAN. Most organizations don’t look at protecting traffic within a security zone and not doing so, can allow for lateral movement of a compromised machine. These types of ACL’s are normally attached to an individual VLAN via VLAN access maps (in Cisco terminology). I make these ACL’s as small as I can, so they would permit all expected host to host traffic within the VLAN, then block all other traffic that is sourced and destined to host within the VLAN, and lastly, allow all other traffic. You may think allowing all traffic at the end of the ACL is not a good security practice. However, since we are only concerned with traffic sourced and destined within the same VLAN, we are relying on the upstream Inter-Zone policies to actually protect the traffic destined from one VLAN to a different VLAN… defense in depth.
- Host-Based ACL’s
- Implement host-based ACL’s as a last line of defense to provide a bit of redundancy in the event of a misconfiguration on the upstream network devices. I would also recommend adding in host-based ACL’s on all devices. Normally, I would employ these in an inbound-only manner. This is because I’m only concerned with protecting against inbound communications, as I’m relying on the Intra and Inter Zone ACL’s to stop unwanted outbound traffic.
More Than Just Security
Besides the obvious security aspects of implementing these ACL’s at various points throughout your network, there is one other major operational benefit… visibility. As we mentioned before, I like to add logging on all deny statements. This has come in handy numerous times when troubleshooting host-to-host communication issues. Having a record of traffic that the network devices (or host-based firewalls) are blocking, can be a useful tool to engineers. More so, it can be used to prove that the traffic is not being stopped by your network devices and thus the communication problem lies further up the communications stack.
In a small environment, you can manage doing this on a per device basis. In reality, though, it’s a much better idea to send these logs (as with all other logs on these devices) to a centralized log server/ SIEM. In that scenario, it would be much easier to search for log entries based off of specific source or destination IP addresses and be able to isolate your problem much faster.
Network ACL’s Wrap Up
The main takeaway here is that ACL’s work great in concert with the network segmentation we covered previously. There are different strategy you should utilize when implementing them at various connection points in your environment. Lastly, it is important to understand the logical flow of how ACL’s are written and implemented in devices. While the context changes depending on the vendor/OS, the underlying principles are the same. So, once you master how they work, you can apply them throughout your environment with confidence.
Next in the six-part series on the basic network security principles (The Fab Five), we’ll be discussing Private Vlans.
Find out more about J.B.C.’s Cyber&Sight™ blog here.