
This past Black Friday, I went on a bit of a hacking tools shopping spree at Hak5. Today, I’m going to give a brief rundown of their Linux based network attack tool call Shark Jack (and why it’s similar to Baby Yoda). Shark Jack is to be used in environments where you are able to get physical access to wired network connections. The information below is for educational purposes only, and you should only use a tool like this on equipment/networks that you are authorized to do so.
Jump the Shark
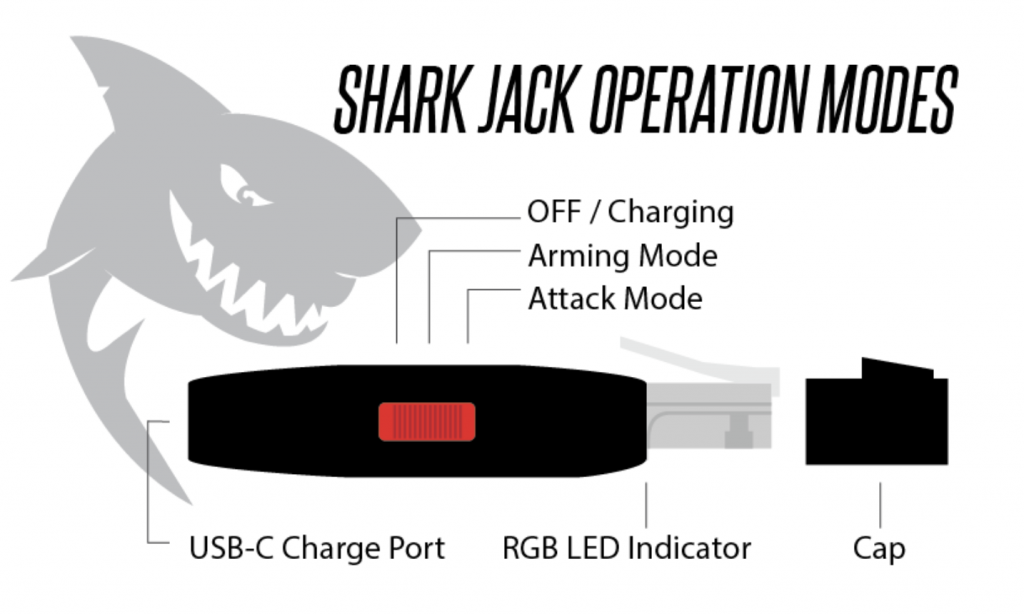
We’re going to get into some more in-depth information on things like payloads, firmware, folder structure and management in a little bit. Honestly though, as soon as I opened up the package, I just wanted to plug it in and see what it would do right off the bat (TLDR, you can plug it in, pull an IP via DHCP, and it runs a NMAP scan automatically). However, even that excitement needed to be tempered in order to understand how to turn it on and what the indicator light glowing from the RJ-45 plug meant.
The diagram below taken from the Hak5 Shark Jack Basics page breaks things down pretty simply. First off, you need to make sure it is charged and this is done by plugging in a USB-C connection to the back of the device (it only takes a few minutes to fully charge). You’ll see it blinking blue when charging. Once fully charged, it will emit a solid blue light indicator.
Once it was fully charged, I was ready to go plug it into my test network and see what it would do. One thing to point out is to make sure not to overcharge the Shark Jack! Make sure not to leave it plugged in charging for an overly long extended period of time. Once it’s fully charged, it should provide 10-15 minutes of lifetime from the moment it’s turned on. So remember, this is for a short duration scan/recon. This, my friends, is why it’s like Baby Yoda. The Shark Jack comes in a small package, has the ability to use the force via bash/python payloads, it gets tired really quickly, and then has to go to sleep after doing its work!

At this point, it would also be a good time to review what the other LED status lights actually meant (I had already seen both version of the blue LED).
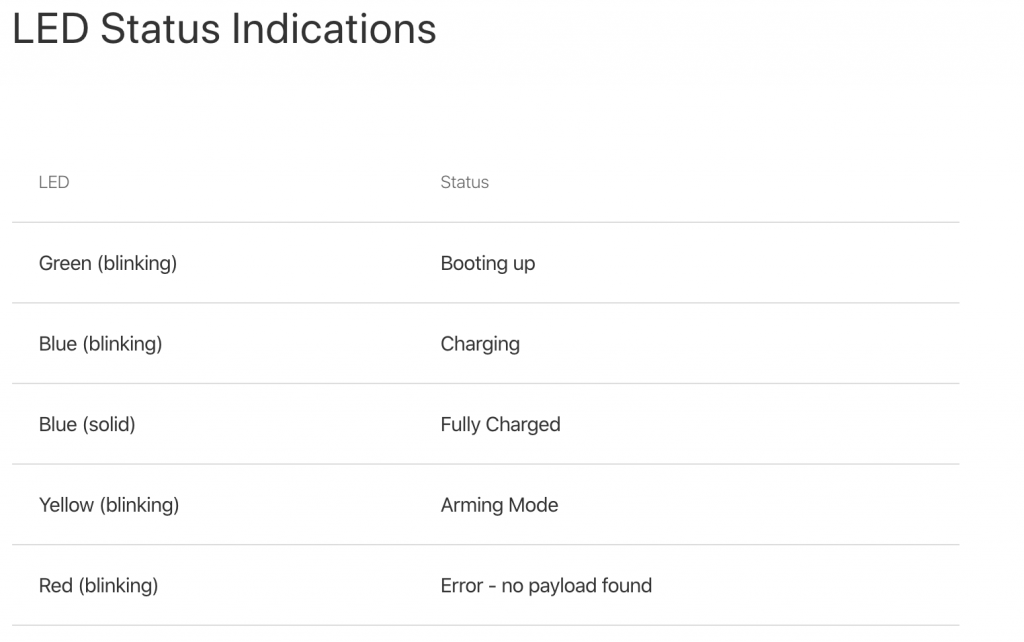
So, I pushed the red operation button to the far right (into “attack” mode) and plugged it into the LAN side of my test network. Once plugged in, it will start blinking green (meaning booting up) and then it will start blinking magenta (meaning it is scanning). Once the scan is completed, it will go to a brief solid green color.
After going through the brief process above, we need to reel back the excitement. We got way ahead of ourselves and now need to go back and read up on what the Shark Jack actually just did, how I can manage it, and what else we can do with. That being said, it’s a good feeling so far that you can take the device out of the package, plug it in, and it works (at least that is the impression so far… let’s see what loot it has for us inside).
The Real Deal
Now let’s get into some technical stuff about what happened behind the scenes. When set to the attack mode, the devices enables DHCP on the interface and pulls an IP address from the network. This is dependant on the connection you are plugging into being live/enabled, not running port security, and is offering up DHCP addresses. So, there is a hit or miss factor here. Depending on the environment, plugging the shark in could set off alarms. It then runs a payload, in this case a simple NMAP scan. This is a Linux based tool, so you can download other Linux tools onto it. You can also add your own payload instead. It will take bash or python payloads (more on this later).
The primary way to access and manage the Shark Jack is by changing the mode selector to the “arming” mode. This means pushing the selector button to the middle position. Then you can take the device and plug it into and network connection on your laptop or PC to manage it. Of course, we would need the default credentials.
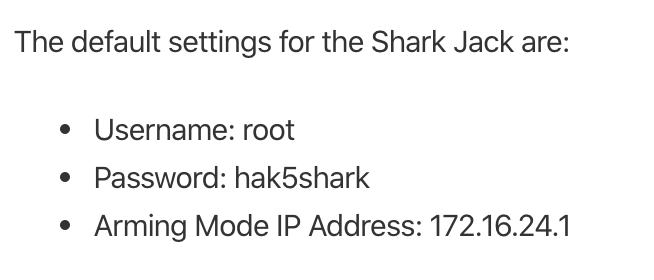
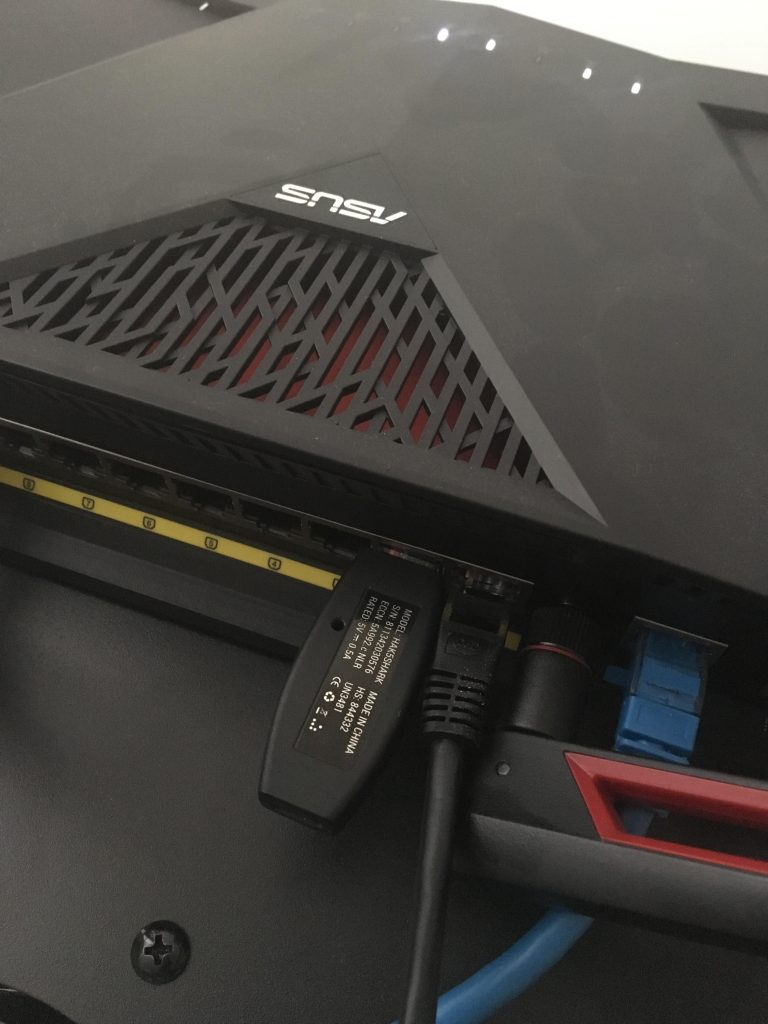
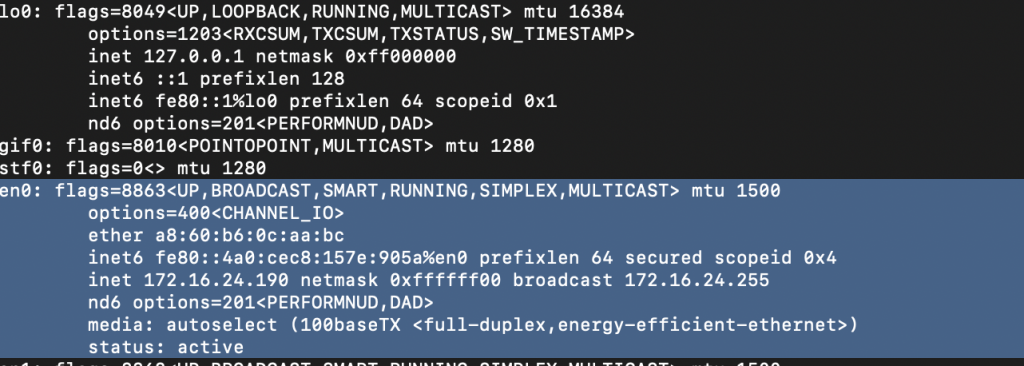
As you can see from the screenshot below, once I plugged it into my machine, it provided a network IP address in the 172.16.42.x range to my PC. I was then able to SSH in the box with the above credentials.
Exploring the Space
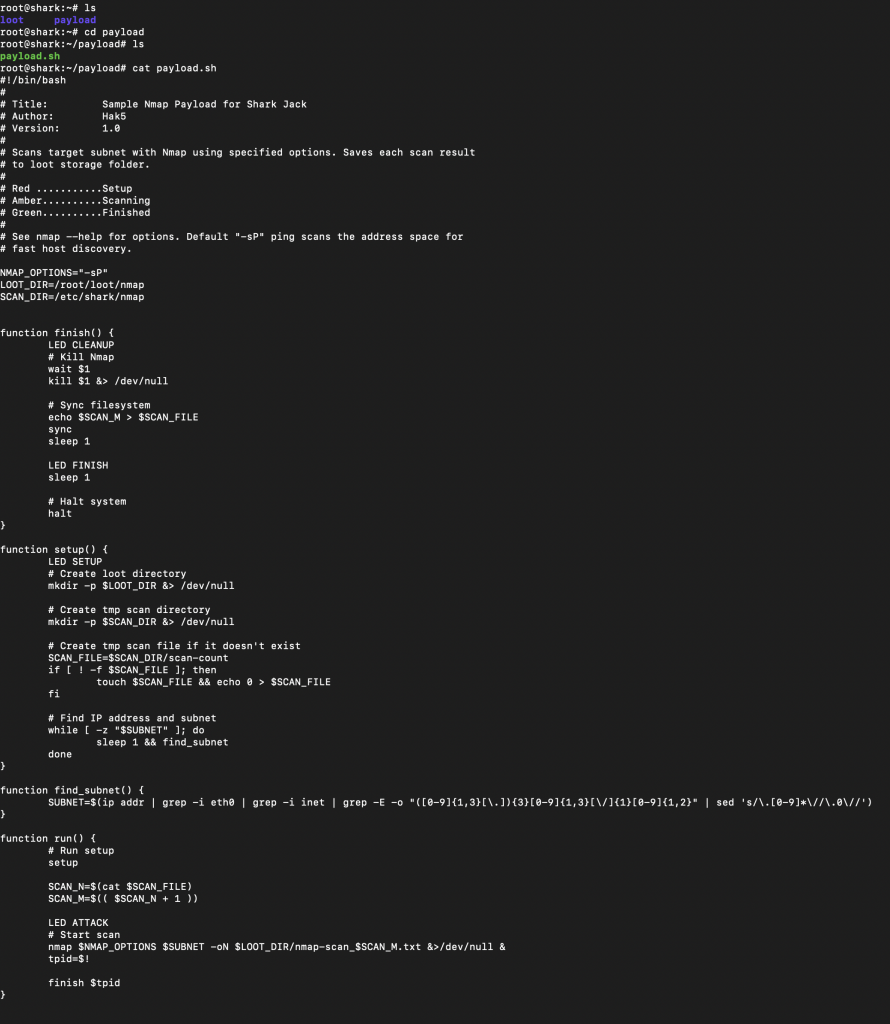
You get dropped in the /root directory and from there you really have three things to look at: the version, the loot directory, and the payload directory. Loot is wherever your payloads drop the data/logs from your scanning, and the payload directory is where said payloads are kept.

We can see below that if we navigate to /loot/nmap/ we can see our nmap scans. The scan itself consists of “nmap -sP -oN”, which is doing a basic ping scan with normal output. Obviously you can get much craftier with your NMAP payload, but this is the default one out of the box. Taking that into account, it’s a decent starting point. We’re able to see some stuff on my local testing subnet, including the router/firewall (Asustek) and my Wifi Pineapple (Orient Power Home Network).

We can take a deeper dive into the payload to see what is going on. We could also modify this here if we wanted to have our NMAP be a bit more robust.
More Options
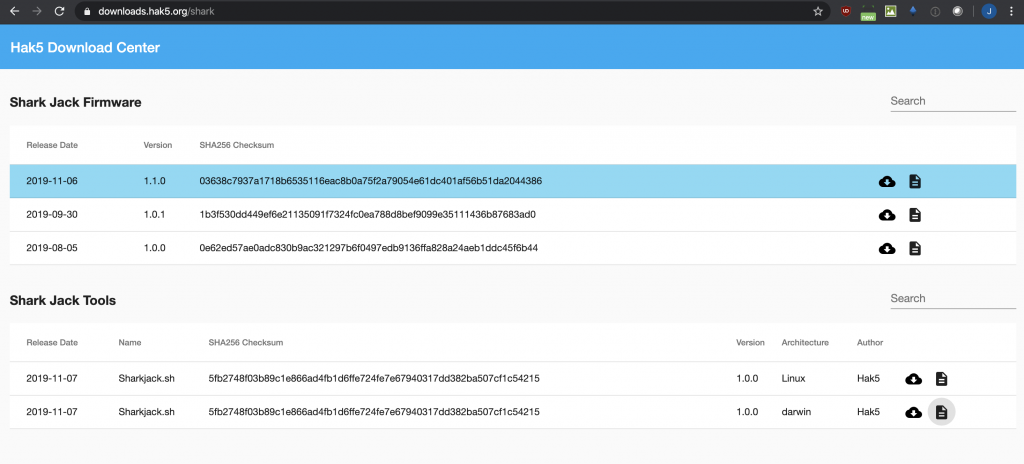
Now we have a basic understanding of the layout and what is going on, what else can we do with it? I wanted to see if there were any firmware updates that might provide some additional functionality. My device was shipped with 1.0.0 and the latest is 1.1.0. In going to update the firmware, I came across a nice Shark Jack utility that you can download that helps make managing the device a little bit easier (it will save you a few commands here and there). So first, I downloaded the Shark Jack Tools from the location below. I did have to “chmod +x sharkjack.sh” to make it executable (for those trying at home).
So, after running “./sharjack.sh” I got these neat little interface. This would streamline my firmware upgrade. I first chose “C” to connect, and after accepting the SSH key for the first time and using the default credentials, I was able to connect.
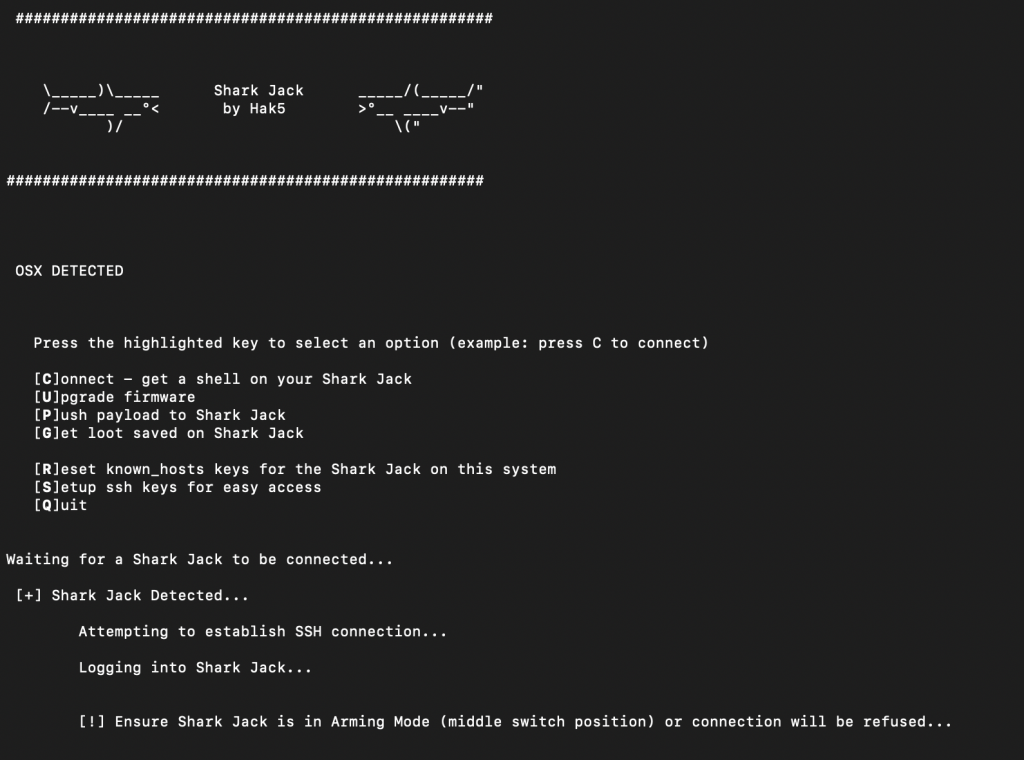
After verifying connectivity, I then decided to go the “U” route to upgrade the firmware. I made sure it had power connected to it and the total upgrade took a couple of minutes.

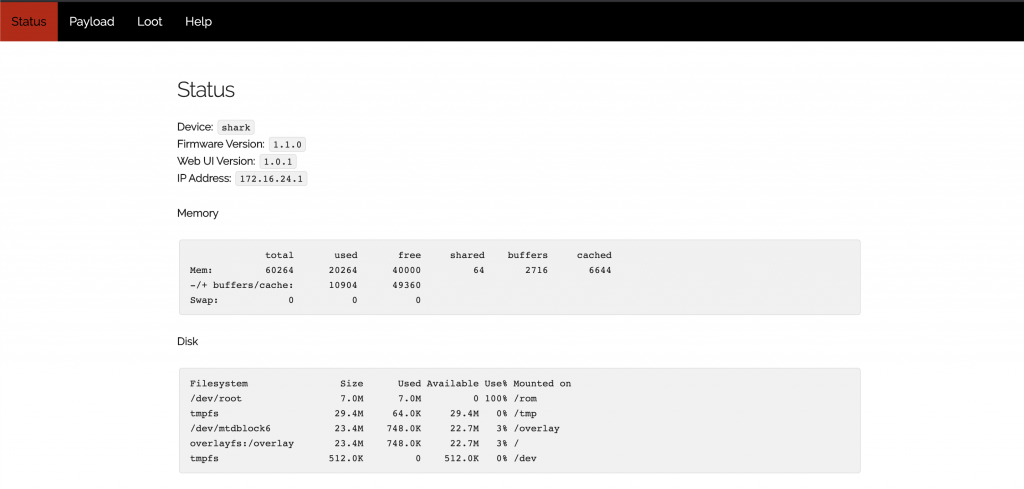
So, what do you get with the latest firmware upgrade? How about a snazzy new WebUI! You are now no longer burdened with the pain of the CLI and SSH connections 😛
On the serious side, this interface allows you to see both the current payload and any loot (scan logs) you might have collected. As well, it shows some health and configuration data about the device.
Raining Payloads
Besides creating or modifying your own payloads, Hak5 offers a few that they prominently feature on their website. The Sample NMAP Payload is the one that was tested above. The SSH IP Blinker is unique in that it turns on a SSH server, attempts to get an IP address via DHCP and then blinks the last octet of the host’s IP address. This could prove to be useful as one could then attempt to remotely access the device (with a good guess of the IP address) and upload additional payloads or tool sets to it. There are a lot of things that need to line up correctly for this to happen, but it is still cool in concept!
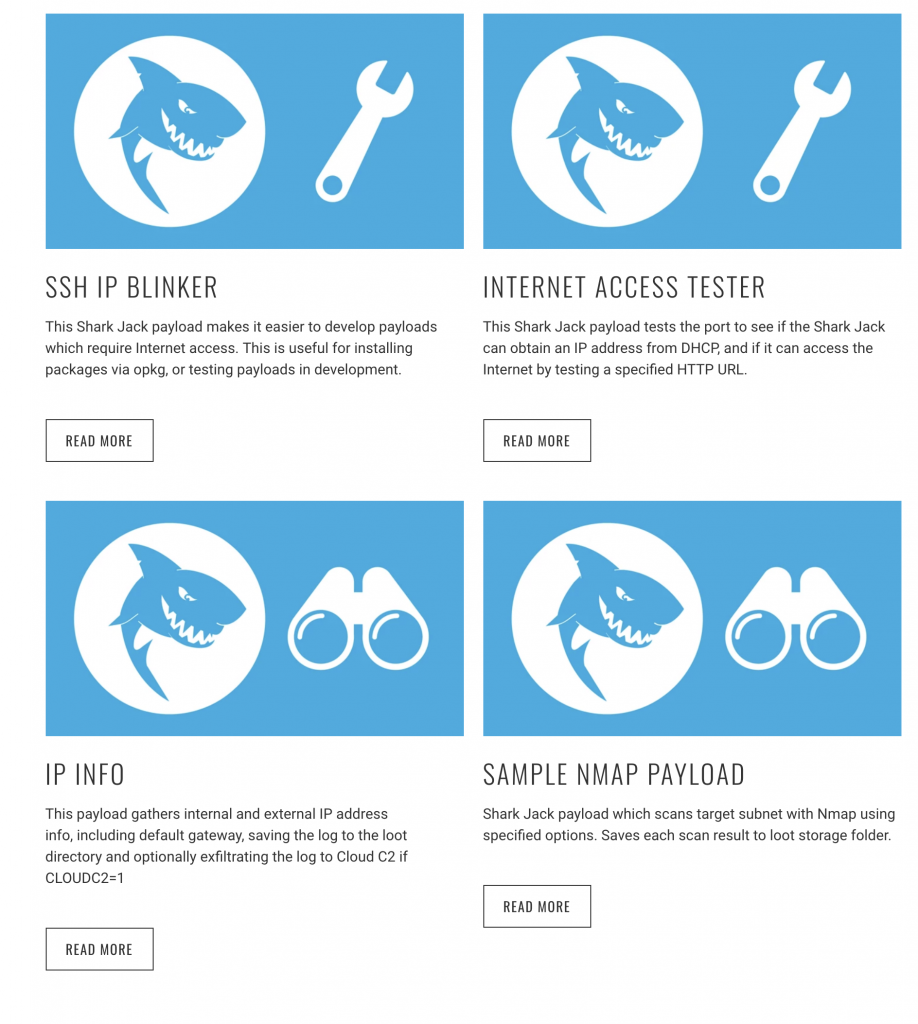
The above payloads can be found here with greater descriptions, as well as a few more additional payloads at the Shark Jack GitHub repo.
To the Cloud!
Like most of the Hak5 tools, you can remotely manage them via the Cloud C² server. There are the prerequisites of the devices to be configured with an IP, have access to the internet, and for the necessary connect commands to have been implemented for them to reach back. Also, you can use their free version (up to 10 devices managed). The basic steps involve creating a profile in your Cloud C² server, downloading a config script, and then uploading it into the Hak5 device you will be deploying. Further information on the server and configurations can be found here.

How to Mitigate (Updated)
One comment by a friend after reading this article was, “Yo that’s actually scary. These tools are easily accessible and the average person doesn’t know anything about protecting their network.” And he is correct, the average business owner doesn’t know how to protect against a tool like this. We could go back and forth of whether a tool like this fits within the threat profile for a small to medium size business vs. an attack on their external websites/payment systems. That being said, there are a few ways that the potential of this type of tool can be minimized.
- Turn off all unused ports on the switches within an IT environment. If unused ports are disabled, then when the Shark Jack gets plugged in, it’s going no where.
- Put all unused ports in a dead VLAN that doesn’t have DHCP enabled. In the event you forget to turn off the unused ports, this is a good second line of defense.
- Implement port security or 802.1x authentication for all devices. The level of effort here will vary, and putting certificates and setting up 802.1x might be a little challenging. Port security or MAC filtering would stop this rogue device from being able to connect.
- Harden DHCP configuration. You could set a MAC pool on your DHCP server, so that only MAC addresses you control will get an IP address.
- Disable DHCP. For larger environments this might not be feasible and the previous recommendations make more sense. For a smaller organization, static IP assignments and removal of DHCP would limit the attack covered here. If the attacker is able to guess the network correctly and statically assign an IP, you could still be protected by the first three recommendations or the last two…
- Implement private VLANs. Your workstation VLAN has no need for the hosts to be able to communicate. Implementing private VLANs with the ports in isolated mode, will limit the ability to most other hosts in the VLAN.
- Implement ACL’s on your VLANs. This too could block all intra-VLAN communication, which in your user/PC VLAN should not be needed.
The Wrap Up
This was the first Hak5 network attack toolset that I have written about. I was pleasantly surprised with how easy it was to deploy and successfully test right out of the box. The rest of the management and access was very straight forward. I could see this being a very useful tool in pentest and red team engagements to gather basic information.
I have a few more Hak5 tools that I will be testing out next (Wifi Pineapple, Packet Squirrel, Owl, Bash Bunny, Rubber Ducky, Lan Turtle, Plunder Bug, and Screen Crab). Lastly, as I mentioned above, this information is for educational purposes only. You should only use tools/techniques like this on equipment/networks that you are authorized to do so. Don’t do something illegal and don’t be an ass! Baby Yoda would be highly disappointed!
Great resources for those interested in diving in a bit more:
- https://shop.hak5.org/
- https://shop.hak5.org/products/c2
- https://docs.hak5.org/hc/en-us/sections/360002701513-Getting-Started
- https://docs.hak5.org/hc/en-us/categories/360002117973-Shark-Jack
Find out more about J.B.C.’s Cyber&Sight™ blog here.